
If you’re looking for a high protein and savoury vegan breakfast, this moong dal omelette is the perfect option.
Most mornings, I prefer a savoury breakfast. I also like a substantial breakfast to keep me going through the morning. In the past, my go-to option was eggs. Either fried, scrambled or an omelette along with some toast or chapatis. I’ve been trying to add more plant-based options to my meals and in the past I have toyed with a vegan swap that uses chickpea flour as a base for an omelette. Typically, I don’t mind the chickpea omelette, but it’s not my favourite thing to eat for breakfast. So I started experimenting with a few lentil options. Today, I’m sharing one of my favourites – the moong dal omelette.
This recipe is the perfect swap for a Masala Omelette. I honestly can eat a Masala omelette for breakfast, lunch or dinner. BTW, it is a great lunchbox option too. And I’m so pleased that this Moong Dal Omelette can pretty much do the same. It’s a great meal-prep recipe. There is a tiny bit of prep required, but I promise its super simple. The only advance prep required is soaking the dal for about 6 hours or overnight. From there on, you simply grind it to a paste. You can use this paste immediately or store it in the fridge for 4-5 days and use it as and when you need it. Perfect for those pesky, busy workdays.
What’s great about this recipe is you can tweak it to your liking. Let me share my favourite version with you.

Moong Dal Omelette
Course: BreakfastCuisine: IndianDifficulty: Easy6-8
servings10
minutes5
minutesIngredients
1 cup moong dal
- For the omelette (to make 2 portions) –
Use 1/4 cup of the moong dal paste per omelette (Adjust this depending on the size of omelette you want)
1/3 onion, peeled and chopped (or to taste)
1/2 chilli finely chopped (or to taste)
1/2 small tomato, chopped (or to taste)
1 tbsp Fresh coriander, chopped (or to taste)
Salt, to taste (**See notes)
Freshly cracked black pepper (to taste)
1/8 teaspoon garlic powder
1/8 teaspoon turmeric powder
1/4 tsp Kala Namak (black salt)
Directions
- Wash the moong dal thoroughly and drain the water. Repeat this process 3-4 times. Add some fresh water at room temperature and leave the moong dal to soak for 6 hours or overnight, making sure the moong dal is fully submerged and has about a couple of inches of water covering it.
- After the moong dal has soaked, drain the water. Rinse with some fresh water once again and drain. Grind the dal with about 1/2 cup of water to a fine paste.
At this stage you can use the moong dal paste to make an omelette or store in a air-tight container in the refrigerator till you’re ready to use it. It should keep for 4-5 days. - To make the omelette –
- In a mixing bowl, add the chopped onion, chilly, tomato and chopped coriander. You can adjust the quantities mentioned above to suit your liking.
- To this add the salt, pepper, garlic powder, turmeric powder and kala namak and mix it through.
- Add the moong dal paste and mix it through. If it is too thick, add a little water, a tablespoon at a time and mix it thoroughly. It should be about as thick as a pancake batter.
- Heat some oil in a pan. Ladle some of the pancake mix on the pan and spread it around. I keep this on the thinner side so that it cooks through.
- Cook on a medium heat till it develops a little colour and the edges go a little crisp. Turn over and cook on the other side as well.
Serve hot with some chapatis or some buttered toast.
Recipe Video
Notes
- Use a little less salt in the recipe, because we will also be using some black salt (kala namak). The Kala Namak adds that eggy aroma to the omelette. You can find Kala Namak at you local Indian grocery store.
How to make Idlis from scratch
Idlis are soft and fluffy steamed rice cakes, made from a fermented batter. Serve them hot with a nourishing sambhar and a tangy chutney.

If you’ve never heard about idlis before, you are in for an absolute treat. They are little steamed savoury rice cakes that are made from a fermented batter and are relished with a piping hot sambhar (lentil and vegetable stew) and a tangy coconut chutney.
Back when I lived it Mumbai, these idlis, like a lot of other South Indian snacks were readily available in local South Indian restaurants as well as little street food stands that dot the city. It was really easy to pop in to one of these joints for a piping hot plate of them. So needless to say, while we really enjoyed South Indian food, back then, I never even thought of making them at home. Ofcourse if you’re ever overcome with a feeling of adventure and feel the urge to try making them at home, you could buy the batter from a lot of little local shops. I did buy the batter a few times, but only ever to make Dosa – another South Indian treat that I’ll share with you very soon.
That being said, most South Indian homes, make their batter from scratch. I somehow never got around to trying that out. Until I moved to Sydney, that is. Here, you can still go visit an Indian restaurant and most of them serve up some South Indian food. Some Indian grocery stores stock the fermented batter too. The only catch is, you may have to travel a bit to get to one such restaurant or store. Also, if you do find one, it can be quite pricey. I mean, I always knew what went into the batter. There was nothing stopping me from trying it out at home. So, a few years ago, that’s exactly what we did.
Making good Idlis from scratch is a fairly simple process. It is a little lengthy, but it’s mostly hands-off time to let the batter ferment and such. There is very little hands-on time involved.
There are three basic elements that make a great Idli plate –
- The Idlis – Today I’m going to share with you my tried and tested process for making the batter from scratch and how I make soft and fluffy Idlis using this batter.
- Sambhar – A Sambhar is a lentil and vegetable stew that’s really easy to make. I’ve shared my recipe in the past. If you haven’t seen it yet, you can check it out here – Vegetable Sambhar
- Tangy Coconut Chutney – This no cook recipe uses just a few ingredients and can be served alongside a variety of South Indian meals and snacks like Dosas, Vadas and so on. You can check out my go-to chutney recipe here.
The Idli batter –
Making the batter is a fairly simple process. However, there are a few tips to keep in mind to make sure you get the best results.
What type of rice can be used?
For best results, use Idli rice. Idli rice will be labelled as such and is quite easy to find in most Indian grocery stores. Idli rice is a short grain variety of rice that is par-boiled. Being par-boiled doesnt mean it will look soft or semi cooked. It will still look and feel like uncooked rice and you will find it stocked with other varieties of rice.
If you can’t find Idli rice, use another short or medium grain rice. I would not recommend Basmati rice for this.
The rice to lentil ratio –
I personally find that a 1:4 ratio works best. I’ve tried a few other variations but this gives me the best results. So for every 1 part of urad dal (hulled and split black lentils), I use 4 parts of rice.
Grinding the batter –
Ideally a wet grinder is used to grind the grains into a batter. I currently use my Vitamix blender to grind the grains and it works beautifully. You can also use any other high-speed blender.
If you don’t have a high-speed blender, you will still be able to make the batter in a regular blender. You will just need to grind it in smaller batches. I have successfully used my old Phillips blender in the past.
Fermenting the batter –
The fermentation process can be a little fickle from time to time. Also, depending on weather conditions, the time taken to ferment your batter can also differ. I’ve had to experiment with the process quite a few times to figure out what works best. These tips should give you an idea of what to expect.
The batter needs a warm environment to ferment. If it’s warm where you are, the batter can simply be left on your kitchen counter to ferment. But if it is cooler, leave the batter in a warm spot in your house.
For me, unless it’s a hot day here in Sydney, I usually place the batter in my unheated oven and leave it there to ferment for about 8 hours. During winter, I warm up my oven for a couple of minutes at 100ºC, just till the oven is at room temperature (or what a summertime room temperature would feel like), turn the oven off and leave the batter to ferment in there.
How to tell if you’re batter is fermented?
The batter will have increased in volume. This increase is fairly significant, so make sure you use a large vessel for this. You will also notice that the top layer of the batter is slightly frothy. Your batter will also have developed a slightly fermented aroma.
If you don’t notice these changes to your batter, leave it to ferment for another couple of hours or so. There are times where it has taken me upto 10-11 hours for the batter to ferment.

How to make Idlis from scratch
Course: BreakfastDifficulty: Medium3
dozen15
minutes15
minutes3
minutes8
hoursIdlis are soft and fluffy steamed rice cakes, made from a fermented batter. Serve them hot with a nourishing sambhar and a tangy chutney.
Ingredients
3 cups Idli rice
3/4 cup urad dal (hulled and split black lentils)
1 tbsp fenugreek seeds
Salt, to taste
Directions
- Wash the rice, dal and fenugreek seeds with cold running water about 3-4 times or until the water runs clear.
- Place the washed grains and fenugreek in a large bow. Add some fresh water to the bowl. Use enough water to cover the grains by about 2 inches. Leave this to soak for 3 hours.
- After 3 hours of soaking, grind it to a batter using a little of the soaking liquid as needed. You need a thick batter, almost like the consistency of a pancake batter. You may need to do this in batches.
- Transfer the batter to a steel stockpot or large vessel. (The vessel should be large enough to hold about double the quantity of the batter, because the batter will expand as it ferments.) Cover the vessel and set aside in a warm spot for about 8 – 10 hours to ferment. (Please refer to the section on “Fermenting the batter” in the post above.)
- Once the batter has fermented, remove as much batter as needed for immediate use in another bowl. Store the rest of the batter in the fridge for future use. You can store the batter for about 3-4 days.
- To make the Idlis –
- Work with the batter that you intend to use immediately. To this batter, add a little salt to taste.
- Grease an Idli stand with a little oil.
- Ladle the batter into the idli moulds till they are filled about 80%. The Idlis will rise and expand during cooking.
- Steam the Idlis for about 15 minutes on medium heat till they have cooked through. Pierce the idlis through the centre with a toothpick. If it comes out clean, the idlis are ready to serve. If it is still a little sticky, cook for a couple of minutes more or till done.
- Take the stand out of the steamer and leave to rest for a couple of minutes. Demould idlis by running the blunt edge of a butter knife around the edges to loosen it from the mould. Serve hot!
Recipe Video
Notes
- Please note, the number of Idlis will depend on the size of the mould you use.
- Idlis are best eaten immediately after cooking, but any leftovers can be refrigerated and steamed till re-heated thoroughly and eaten the next day.
Pav Bhaji – A quintessential Mumbai Street Food Delight made Vegan
Pav Bhaji – A quintessential Mumbai Street Food delight that is chock full of veggies and made into an indulgent treat with generous lashings of butter. Today’s recipe is a vegan version of this treat.

Today has me longing to get back to normal. Back to the days where we could travel freely, explore, meet up with loved ones and all that good stuff. It’s probably the weather, which is cold, wet and grey here in Sydney. It’s days like this that also have me longing for some comfort food. For me, personally, comfort food changes from time to time. Sometimes, its a big bowl of soup, other times its a big bowl of steamed broccoli. I know, right! Broccoli = comfort food? At times I wonder whether thats normal. Well that’s a mystery for another day, but on more normal days, comfort food is usually Indian food and more often than not, the Street Food kind.
Today, I’m going to treat you to one of my favourites – the good ol’ Mumbai style Pav Bhaji. Never heard of it before? Well, there’s 2 components to it Pav – bread (not any bread, but a dinner roll thats split in two, buttered and lightly toasted.) and Bhaji – a mixed vegetable mash that has been cooked in butter with some beautiful, mild, but warming spices and topped off with some more butter. Usually the bread is toasted on the same pan the veggies are cooked on and it absorbs some of the flavours of the veggie mix, but today we’re keeping things simple. I’m just going to use another pan.

If you’d like to try your hand at making some delicious Laadi Pav, try this recipe out. It works like a charm. In the spirit of keeping things simple, I’m just using some store-bought bread rolls today.
The Bhaji or vegetable mix is a really versatile component. Everyone that makes a Pav Bhaji, has their own version. A lot of recipes call for a Pav Bhaji Masala. You can find this at almost any Indian grocery store, but I usually refrain from buying something like this spice mix that has just one use. And seeing how Pav Bhaji is an indulgent treat, we don’t make it very often. So after some experimenting, I figured out a combination of simple spices that works really well. The best part is that these spices are really common and if you cook Indian food, you most likely already have them in your kitchen.
So let’s get cooking.

Pav Bhaji (a Vegan version)
Course: MainCuisine: IndianDifficulty: Easy5
servings15
minutes30
minutesPav Bhaji – A quintessential Mumbai Street Food delight that is chock full of veggies and made into an indulgent treat with generous lashings of butter. Today’s recipe is a vegan version of this treat.
Ingredients
1 potato, peeled and cubed
1 carrot, cubed
2 cups cauliflower florets
1 cup green peas
1 teaspoon oil
3 tablespoons of butter, plus more to butter the bread
1 onion, finely chopped
1/2 green capsicum, finely chopped
1 teaspoon minced garlic
1/4 tsp turmeric powder
1 – 1 1/2 tsp Kashmiri chilly powder (or any other mild variety)
1 teaspoon + 1/2 tsp garam masala powder
1/4 cup Passata
Salt, to taste
Freshly cracked black pepper, to taste
Fresh coriander, chopped
5-10 bread rolls (This depends on the size of the bread rolls as well as portion sizes, which on an average may be 1-2 rolls per person)
- Toppings –
Butter
Onion, finely chopped
Fresh coriander finely chopped
Some lemon / lime wedges
The amount of each of these toppings depends on how much you’d like to add to each portion.
Directions
- Boil the potato, carrot, cauliflower and green peas in sufficient water and a little salt (I use about 1/2 teaspoon of salt) till tender.
(I use a stovetop pressure cooker and this typically takes me 10 minutes. This will vary depending on your pressure cooker.) - Heat the oil in a large pan and add 2 tablespoons of butter. Sauté the onions for a couple of minutes till they start softening.
- Add the chopped capsicum and cook till they soften a little.
- Add the minced garlic and sauté for another minute.
- Next, add the turmeric, freshly cracked black pepper and chilly powder and 1 teaspoon of garam masala powder. Stir well and let the spices cook off for a minute, making sure they don’t burn.
- Add the Passata and stir through. Cook this mix for 3-4 minutes.
- Add the boiled vegetables to the pan and stir through. Add a little cooking liquid (from the boiled vegetables) about 1/4 cup. Let this cook off for about 8-10 minutes. If needed, add small amounts of the vegetable stock to get the desired consistency. You don’t want it very runny, but you are looking for a loose consistency.
(Please see the recipe video below.) - Using a potato masher, mash all the vegetables to a chunky mash consistency.
- Check for seasoning and add more salt, as needed.
- Add 1/2 teaspoon of garam masala powder and stir through.
- Add 1 tablespoon of butter and stir through. Take the pan off the heat.
- Split the bread rolls in two and butter both sides and toast off lightly. The bread is best buttered and toasted just before serving, so toast as many as you intend serving immediately.
- To serve, spoon out a portion of the Bhaji, top with a knob of butter, some chopped onion and fresh coriander and some lime / lemon juice. Serve hot with the buttered and toasted bread.
Enjoy!
Recipe Video
Notes
- Cooking time will depend on how you boil your vegetables. It takes me about 10 minutes in my pressure cooker. Your pressure cooker may take longer or if you’re cooking it in a pot on the stove, it could take longer. Please consider this while calculating cooking time overall.
- Leftover bhaji keeps well. Reserve some of the vegetable stock in a little jar and refrigerate along with the bhaji. The next day, heat the bhaji on the stovetop. If it is too thick, add a splash of the reserved vegetable stock to get the desired consistency.
- The bread is best buttered and toasted just before serving. So toast only as many as you intend serving immediately.
Black Bean and Corn Tacos
Black Bean and Sweet Corn kernels come together to make amazing flavor-packed tacos, using a taco-seasoning made from scratch.

Today I’m sharing with you a recipe that is so simple and easy to put together, and results in such an extremely flavorful dish, you are going to be blown away.
That was a bold statement to start off with, right? Well, that’s because it’s the truth. Everybody needs a few recipes like this in their arsenal, because let’s face it, life can get hectic and recipes like this make it easy to get dinner on the table in a hurry. I know a lot of folks do ‘Taco Tuesday’. We personally don’t, but that’s just because we enjoy Tacos whenever we feel like it.
Tacos are usually associated with meat fillings, usually chicken, beef, pork and sometimes even fish or shrimp. But this doesn’t mean you can’t enjoy a really good taco if you follow a plant-based diet. And today’s recipe is going to show you just that.
We’ll be making a quick black bean and corn taco mix and a chunky guacamole to fill our tacos with. For the black bean mix, I use half a cup of dried black beans. These beans are soaked overnight and then pressure cooked the next day. I have a stovetop pressure cooker that gets the job done in under ten minutes. This works out so much better than buying canned beans because there is less waste, it works out to be more economical and I feel the beans are so much tastier. Try it out, if you have a pressure cooker or an instant pot. If not, you can simply use a can of black beans.

My chunky guacamole is also a very basic and simple recipe. It combines the richness of the avocado with the punchy flavors of a pico de gallo or a salsa. And like me, if you just need to serve 1 or 2 people, save the half of the avocado that has the pit still in it, squeeze some lime juice all over the cut surface, pop it into an avocado saver if you have one, or simply cover it with some cling film and pop it into the fridge for the next meal or the next day. This reduces the browning of the avocado. Do you have any tips for storing half an avocado? Leave me a comment and let me know. I’d love to be able to store it without having to use any single use plastic.

Assembling your tacos is one of the most fun parts of this recipe. You can add whatever your heart desires to your taco. Here’s what I use to make up my tacos –
- Hard corn taco shells
- Black bean and corn mix
- Chunky guacamole
- Pickled jalapenos
- Plant based sour cream
- Finely shredded lettuce
If you love a good taco, you simply have to try it out and I hope you love it as much as we do. This recipe makes enough of the bean mix for 12-15 tacos. If you’re serving 12-15 tacos in one sitting, double the guacamole recipe.

Black Bean and Corn Tacos
Course: MainCuisine: MexicanDifficulty: Easy2
servings15
minutes20
minutes8
hoursBlack Bean and Sweet Corn kernels come together to make amazing flavor-packed tacos, using a taco-seasoning made from scratch.
Ingredients
- For the Black Bean and Corn Taco Mix –
1/2 cup dried black beans OR 1 can black beans
1/2 cup sweet corn kernels
1/2 onion, sliced
1/2 capsicum, sliced (See note)
1 large clove of garlic, finely chopped
1 tbsp oil
1/4 tsp smoked paprika
1/2 tsp ground cumin
A pinch of extra hot cayenne pepper powder (optional)
1/4 tsp dried oregano
2 tbsp Chipotle Sauce
1-2 tbsp fresh coriander leaves and stalks
- For the guacamole –
1/2 large avocado
2 tbsp of chopped onion
1/2 large tomato, diced
1 tbsp coriander leaves and stalks, chopped
Salt, to taste
Lime juice, to taste
- For the Tacos –
Hard corn taco shells
Pickled jalapenos
Sour cream
Shredded lettuce
Directions
- To make the black bean and corn mix –
- Wash and soak the black beans for 6-8 hours or overnight. Drain the water, rinse through and cook till beans are done. (I cooked the beans in a stovetop pressure cooker and they get ready in under 10 minutes.)
- Heat oil in a pan and saute the onions till they’ve slightly softened.
- Next, add the capsicum and let them saute for about a minute.
- Add in the garlic and stir fry well till the garlic is nice and fragrant. Be careful and make sure the garlic doesn’t burn.
- When the garlic turns fragrant add the paprika, cumin and cayenne pepper powders and the dried oregano. Stir well.
- Add in the chipotle sauce and stir thoroughly.
- Add the black beans (that have been previously cooked) and the corn (I use frozen corn) to the pan and stir well.
- Let this cook off for a couple of minutes or until the beans and corn has heated through.
- Check for seasoning and adjust as needed.
- Once most of the liquid from the pan has been absorbed, take the pan off the heat.
- Top it off with the chopped coriander.
- To make the guacamole –
- Add all the ingredients to a bowl and mix well.
- To make the tacos –
- Heat the taco shells according to the packet instructions.
- Layer the black bean and corn mix, the guacamole, pickled jalapenos, sour cream and shredded lettuce and serve up.
Enjoy!
Recipe Video
Notes
- The 2 servings mentioned at the start of the recipe is for 2 servings of 4 tacos each (Roughly about 8 tacos). This recipe makes enough of the black bean mix for 12-15 tacos. If you are serving 12-15 tacos in one sitting, you may want to double the guacamole recipe.
- The black bean and corn mix works really well in burritos and quesadillas too.
- You can use 1/2 a capsicum of your choice or you can use smaller sweet peppers instead. In all you’ll need about 1/2 a large capsicums worth of peppers. You can adjust this amount to suit your liking.
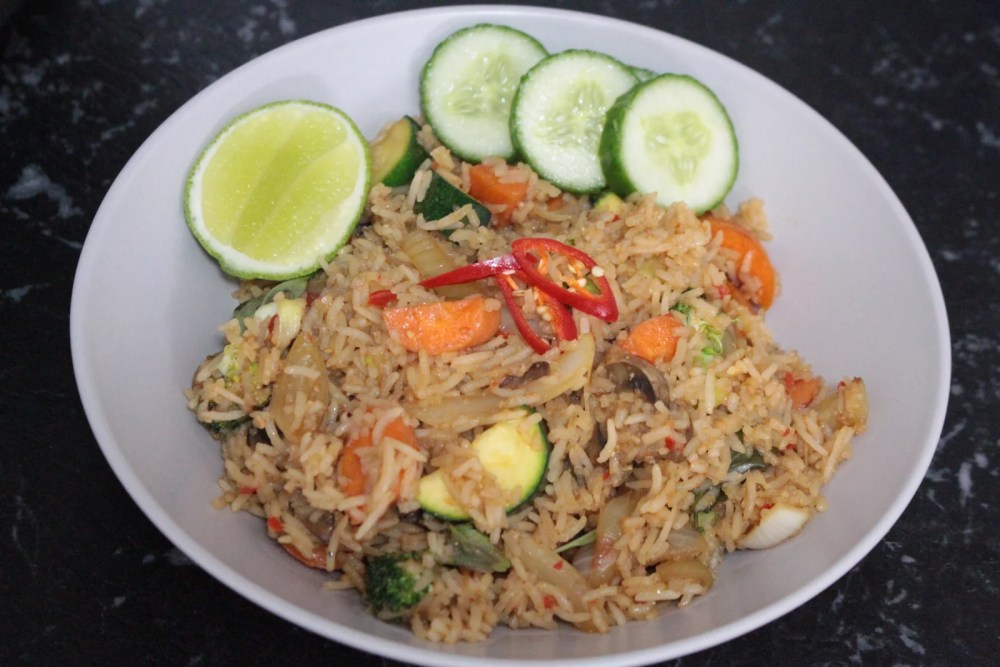
Vegan Thai Chilli Basil Fried Rice
This Thai Chilli Basil Fried Rice is packed with vegetables. It uses all plant-based ingredients but still has all the flavors found in Thai cuisine.
A good fried rice is a must have in every aspiring home cook’s arsenal. I enjoy fried rice a lot. Sometimes, I think, maybe a little too much. But in my defense, what’s not to love about it? While I love a good Chinese style fried rice, this Thai Chilli Basil Fried Rice has become a new favorite.
Its a simple meal in itself that is super versatile. You can use a lot of different vegetables, whatever you have on hand. It requires just a little advance planning in the form of cooking the rice ahead of time. Combine that with a clever use of some sauces that I always keep on hand and I can sit down to a nice, hot, home cooked meal in a jiffy.
In the past, I’ve always relied on a Chinese style fried rice. But a couple of years ago, when I tried a Spicy Thai Chilly Basil Fried Rice at a local Thai restaurant, I was smitten. All this flavor and spice – this fried rice blew my socks off. I ordered it every time we went out for Thai food. After a few such instances, I knew that I simply had to learn to make this at home and so with some experimentation, I ended up with a recipe that was really close to my favorite version.
Fast forward to December 2019. Just a few weeks before Christmas, my husband and I decided to switch to a more plant-based diet. And I’m happy to report that we’re loving every bit of this new plant based diet. The last couple of months have involved a lot of experimentation and researching substitutes to make my favorite recipes vegan-friendly. And I have finally found the ever elusive ‘mushroom oyster sauce’ that always seems to be sold out at my local Asian grocery store. Obviously, the next step was to try a vegan version of my Thai Chilli Basil Fried Rice.
It took a little tweaking, but OMG, this fried rice is phenomenal. I think I may like it a little more than the original recipe. So if you like Thai food, whether or not you follow a plant based diet, you must try this recipe out. Its a simple recipe, but is so flavorful and packed with veggies, that I promise you won’t even miss the meat.
So let’s talk about the recipe. There are a few steps involved but they are all really easy to follow. The fried rice is ready in minutes and its best to have all the components prepped and ready to go.
Step 1 – Making the rice
I used some Basmati rice as that’s what I had on hand. Wash the rice out a couple of times and soak it in some water for about 30 minutes. Drain the water, rinse with some fresh water. Bring a large pot of water to a boil, season with salt, add the rice and cook it till is done about 80%. The rice should still have a little bite and shouldn’t be too soft. Let it cool completely.

It’s best to cook the rice atleast a few hours before you need to make the fried rice. You can even make the rice the previous day. Let it cool completely and refrigerate till you need to use it.
Step 2 – The spice paste
This couldn’t be simpler. Its a combination of some Thai birdseye chillies and garlic. We like our food spicy and this recipe is no exception. If you like Thai food but want to cut down on the spice, you can use a combination of birdseye chillies and some cayenne peppers or any other milder chilly. Grind this to a coarse paste.

Step 3 – The sauce
This sauce makes this fried rice what it is. I have had to make a few substitutions to make this recipe vegan friendly but I believe this combination of sauces comes really close.
Simply stir together all the ingredients for the sauce – the miso paste, soy sauce, mushroom sauce, white pepper powder and sugar. Set this aside to use once we start cooking.

Step 4 – Prepping the veggies
Clean and cut all the vegetables and keep them ready. I use onions, carrots, zucchini, mushrooms and broccoli.
Pick the Thai basil leaves and keep them in a separate bowl.

Step 5 – Making the fried rice
This is by far the easiest part of the recipe. Now that all our prep work is done, the rest is just a matter of stir frying our ingredients in stages. Make sure you use a large wok or a large enough pan. At this stage, all the cooking is done on a high heat.
Now that you’re familiar with the process, let move on to the recipe.

Vegan Thai Chilli Basil Fried Rice
Cuisine: ThaiDifficulty: Medium2
servings15
minutes20
minutes30
minutesThis Vegan Thai Chilli Basil Fried Rice is packed with vegetables. It uses all plant-based ingredients but still has all the flavors found in Thai cuisine.
Ingredients
2/3 cup basmati rice
3 Thai birdseye chillies
4 large cloves of garlic
A small handful of Thai basil leaves
A small wedge of lime
2-3 tsp. peanut oil
- For the sauce –
1 tsp red Miso paste
2 tbsp soy sauce
1 1/2 tbsp Mushroom Oyster Sauce
1/2 tsp White pepper powder
1 scant tbsp raw cane sugar
- Vegetables –
1 onion
1 zucchini
1 carrot
5 cup mushrooms
1/2 cup broccoli florets
Directions
- Wash and soak the rice for 30 minutes. Drain and rinse with some fresh water and drain again. Bring a large pot of water to a boil, season with salt. Add the drained rice and boil till the rice is cooked about 80% of the way. Drain and rice and cool completely.
**See Note 1. - Prep the spice paste. Grind the chillies and garlic to a coarse paste and set aside.
- Make the sauce. Place all the sauce ingredients in a bowl and stir together till well combined.
- Prep the vegetables. Peel and cut the onion into thick slices and separate the onion layers.
Cut the zucchini and carrot in half lengthwise and cut into thick slices.
Slice the mushrooms. Cut the broccoli into small florets to help it cook faster. - To make the fried rice –
- Heat a large wok on high heat. Add 1 tsp peanut oil and fry the mushrooms till they develop a little color.
- Add another spoon of oil and add the onion. Stir fry till the edges of the onion slices start caramelizing.
- Add the broccoli and stir fry till it has cooked about half the way.
- Add the carrots and saute.
- Then add the zucchini and saute till the veggies cook through to your liking.
** See note 3. - When the vegetables are cooked, add the chilli garlic paste and stir through well.
- Stir the sauce and add to the wok. Stir through to distribute well.
- Immediately add the rice and gently stir through to coat the rice with the sauce.
- At this stage, let the rice cook through for about 20-30 seconds or till the sauce has been absorbed by the rice and the rice has heated through well. Gently stir fry the rice while it is heating through.
- Take off the heat and add the Thai basil leaves and stir through.
- Serve hot with some cucumber and a wedge of lime.
Enjoy!
Recipe Video
Notes
- 1. Boil the rice atleast a few hours before you need to make the fried rice. You can boil the rice the previous day. Cool it completely and refrigerate till you need to make the fried rice the next day.
- 2. You can use regular white sugar to replace the raw cane sugar. If using white sugar, reduce the amount of sugar used.
- 3. I prefer my veggies a little on the crunchy side. You can choose to cook the vegetables a little more till they are done to your liking.
French Beans Foogath – A Goan Style Green Beans Stir Fry


French Beans Foogath – Goan Style Green Beans Stir Fry
Course: SidesCuisine: GoanDifficulty: Easy4
servings20
minutes15
minutesA Goan style Green Bean stir fry, simple to put together and packs a big flavour punch
Ingredients
1/4 kg green beans / french beans (approximately)
1/2 tsp mustard seeds
2 chillies, cut into quarters lengthwise
1 onion, peeled and chopped
A little grated coconut
1 tbsp oil
Salt, to taste
Directions
- Prep the green beans by washing them, trimming the ends and chopping into little pieces.
- Heat some oil in a pan.
- Add the mustard seeds.
- When they start spluttering, add the chillies and stir for a few seconds.
- Add the onion and saute till they’ve softened and they start developing a little color.
- Add the green beans and stir well. Stir fry for about a minute.
- Add a little salt and stir through for about another minute.
- Add a couple of small splashes of water. Let the water come to a boil. Lower the heat, cover the pot and let the vegetable cook.
- Check the vegetable in a couple of minutes. Stir and ensure there is sufficient water. Add more water if needed.
- Check for seasoning and adjust if required and let it continue to cook till done.
- When it’s almost done, add the coconut and stir through. Let it cook for another minute or so, to let the coconut warm through.
Serve hot.
Enjoy!!!
Recipe Video
Tambdi Bhaji or Red Amaranth Leaves Stir-fry


Tambdi Bhaji or Red Amaranth Leaves Stir-fry
Course: SidesCuisine: GoanDifficulty: Easy4
servings20
minutes15
minutesVibrant and full of flavour, this red amaranth vegetable dish is sure to stand out at your dinner table.
Ingredients
2 large bunches of red amaranth leaves
2 tbsp oil
1/2 tsp mustard seeds
2-3 green chillies, slit
1 onion, chopped
2 heaped tbsp grated coconut
Salt, to taste
Directions
- To prep the vegetable, break off the roots and the woody part of the stems and discard. Wash the leaves under cold, running water and drain. Wash it out a couple of times or till clean. Roughly chop the vegetable and keep aside.
- Heat the oil in a large pot on medium heat. Carefully tip in the mustard seeds.
- When the seeds splutter, add the chillies and let them fry till fragrant.
- Add the onions and saute till they soften and turn slightly pinkish.
- Add the chopped vegetable and stir well to coat it in the oil and onion mix. Let the vegetable stir fry for a couple of minutes. You will notice it wilting already.
- Add some salt, to taste and stir well to mix.
- Add a couple of tablespoons of water and mix through.
- Cover the pot and cook on medium heat for about 3-5 minutes or till the vegetable is tender and most of the water has evaporated.
- Add the grated coconut and stir through. Check for seasoning and add more salt, if needed.
- Cover the pot and let it cook for about another minute to let the coconut heat through.
Serve hot. Enjoy!
Recipe Video
No-cook Almond Marzipan Recipe – an easy addition to your Christmas platter

How do they both compare? Well I found that the cashewnut marzipan is lighter while the almond one is a little on the denser side. That being said, the almond version is super delicious. I think even more than the cashewnut one. Then, there’s also the fact that the almond one is a no-cook recipe. So, to sum up, I will still make my cashewnut version as it is a little easier to work with, but the almond one will be absolutely perfect to use in so many different ways. I’d love for you to try it out and tell me what you think of it.

No-cook Almond Marzipan Recipe
Course: DessertDifficulty: Easy250
grams30
minutesThis delicious no-cook almond marzipan recipe is the perfect easy alternative to the cooked variant. Use it in desserts on your Christmas platter or any way you desire.
Ingredients
1 cup raw, natural almonds
1/2 cup icing sugar
1/2 tsp rose water (you can add a little more if needed)
1/2 tsp almond extract (you can add a little more if needed)
Directions
- Place the almonds in a heatproof bowl.
Pour water from a recently boiled kettle over the almonds to cover the nuts. Leave the almonds to soak for a couple of minutes. - Drain the almonds and peel them. Place them on some kitchen paper or a clean kitchen towel to dry up. Let the almonds cool down completely.
- In a high powered blender / food processor, blitz the almonds to a fine powder.
- Place the almond powder in a large bowl. Add in the icing sugar. Mix it thoroughly till combined.
- Add the rose water and almond extract and knead to form a dough / log.
Your marzipan is now ready to be used.
Recipe Video
Notes
- If you don’t need to use it immediately, you can wrap it in cling film and refrigerate till needed. It keeps for a couple of months. (Personally, I would just make this when needed, probably a couple of days ahead.)
- This marzipan is not a very sweet version. When the marzipan is formed, taste some of it. If you want it sweeter, simply add some more icing sugar and knead it in.
Chana Masala – Curried Chickpeas. You won’t believe how easy it is!


Chana Masala
Course: MainsCuisine: IndianDifficulty: Easy6
servings10
minutes40
minutes8
hoursMake meatless meals q delicious and wholesome hit with this Chickpea curry. Better than take-out, you’ll come back to this recipe whenever you feel the craving for some Indian food.
Ingredients
1 cup dry chickpeas (Wash, soak for 6-8 hours and cook till tender. Reserve the boiling liquid.)
1 bay leaf
2 inches of cinnamon
5-6 cloves
8-10 peppercorns
2 green cardamom pods
1 black cardamom pods
1 tsp cumin seeds
1 onion, finely chopped
2 green/red chillies, split lengthways
1/2 tsp ginger paste
1 tsp garlic paste
1/2 tsp turmeric powder
1 and a 1/2 tsp Kashmiri chilly powder
1 and a 1/2 tsp garam masala powder
1 cup tomato puree / passata
1 tbsp oil
Salt, to taste
1/2 tsp sugar (optional)
Fresh coriander leaves and stalks, finely chopped, to garnish
Directions
- Heat the oil in a large vessel.
Add the bayleaf, cinnamon, cloves, peppercorns and cardamom pods. - When the spices turn aromatic, add the cumin seeds and stir.
- Immediately add the chillies and onion. Saute till the onions have softened and have starting getting a little brown around the edges.
- Add the ginger and garlic paste and stir through. Saute for another minute.
- Add the turmeric powder, chilly powder and garam masala powder and stir well.
- Add a couple of tablespoons of the stock from cooking the chickpeas to deglaze the pan and prevent the spices from burning. Stir through thoroughly.
- Now add the tomato puree and cook for 3-4 minutes stirring every once in a while.
- Add some more stock to bring the curry to the desired consistency. Please note, the curry will thicken a little as it cooks.
Bring it to a boil. Cover the pot and simmer for 5 minutes. - After 5 minutes, stir and check for seasoning. Add more stock if needed. Add more salt, if needed. Add 1/2 tsp of sugar. (Depending on the tomatoes you’re using, you may need to add a little more sugar. Add to taste.) Stir through. Cover and simmer for another 5-7 minutes.
- At this stage your curry should be cooked. Lastly add in the boiled chickpeas. Cook for another couple of minutes till the chickpeas have heated through.
Garnish with chopped, fresh coriander and serve hot.
Enjoy!!!
Recipe Video
Eggless Nankatais – A great biscuit option for Christmas

Let’s talk about the dough for a bit. It is such a ridiculously simple recipe, you will be surprised at how tasty the nankatais turn out. I find that this dough can be a little finicky and it usually works beautifully on a slightly warm day. While that works beautifully for us in Australia and anyone in the Southern Hemisphere, it could be a challenge in the Northern Hemisphere, where its the middle of winter. If its cold where you are, you might find that the dough ends up a little crumbly and you may have a little difficulty shaping it into a cookie. When that happens, I pop the dough in an ovensafe bowl and pop it into a slightly warm oven (about 100 degrees) for a couple of minutes. This helps the ghee warm up and helps bind the dough.

Eggless Nankatais – A great biscuit option for Christmas
Course: CookiesCuisine: IndianDifficulty: Easy30
cookies20
minutes15
minutesThese melt-in-your-mouth biscuits are perfect with a cup of tea and are so good, you can proudly add them to your Christmas platter.
Ingredients
1 1/3 cup all purpose flour
1/3 cup besan (chickpea flour)
1 cup sugar (superfine. You can also powder larger grain sugar and then use it in the recipe)
2/3 cup of ghee (clarified butter)
1/4 tsp baking soda
Directions
- Preheat your oven to 180 deg. Celsius and line a baking tray with some baking / parchment paper.
- Mix the ghee and sugar till it is light and creamy. Scrape down the edges and bottom of the mixing bowl halfway through the process.
- Add the rest of the ingredients (baking soda, all purpose flour and chickpea flour) to the mixing bowl and continue mixing till it forms a dough.
- Shape into little cookies by rolling portions of the dough into a little ball and flatten it slightly. Place the cookies on the lined baking tray.
- Bake for 12-15 minutes or till done. Your looking for a light colour on the edges.
- Take it out of the oven and leave the cookies to cool on the tray itself.
When completely cool, store in an airtight container.
Enjoy!